Overwhelmed Part 2 – Teams

In my previous blog post, I talked about multitasking and how to handle it by using pull instead of push. In this post, I would like to expand on the concept to teams and my thoughts on how to optimize.

Now for this, I’m going to assume you are wanting to use Agile methods, but this could possibly work with a staggerd waterfall approach.

The Basics

In order to increase flow, you have to start at the basics.
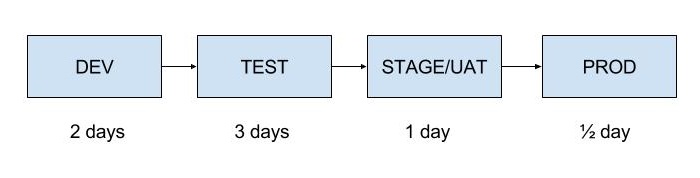
Lets say you have 4 stages before your piece of work goes into prod.

Each piece of work goes through each stage.

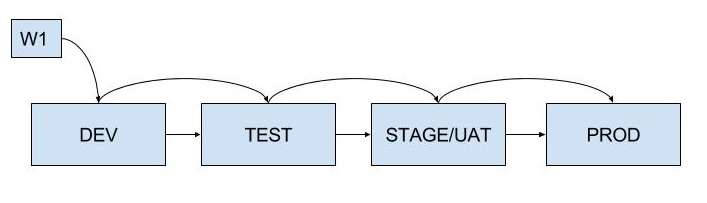
As you have multiple pieces of work, each piece will go through each stage as it is pulled through the system to completion.
Since I’m assuming that you are doing Agile, each piece of work should take no more then a couple of days to complete. So initially, Test should be waiting 2 days before it starts testing. Stage/UAT should be waiting 4 days and nothing should be going to prod until about day 6. Now I’m talking stages here – not people. This system works if you have one person doing all 4 stages or if you have separate people for each stage.
Again, this is highly speculative, things may vary from situation to situation but I’ll get to that later.

Now, does this model remind you of an an assembly line? If so, that is exactly what we are trying to model here. Once we have the assembly line running with features going and everyone is working on something, our next step is to try to achieve flow.

Flow

Flow just as the name implies is that the work flows from one stage to the next without stopping. Now I hear you say, that is impossible to achieve – well that is not the point. The point is to try to achieve that goal. If you don’t try, them you definitely will not reach that goal.

Now I hear you say, work doesn’t flow through evenly through. There are variances. One task may take 2 days. Another will take 5 days at the same stage. Another half a day. Also, Testing may only take a half a day for something that took 2 days to develop, or vice versa. I will go through that later, but I’m more interested in averages, but when there isn’t an average, the largest time will do.

Analyze The Variance

This is the next step. Analyzing the variances.
In order to do this, we need to identify the time it takes for a feature to travel within each stage, and how long it waits between stages.
The time it takes within each stage helps us identify bottlenecks.
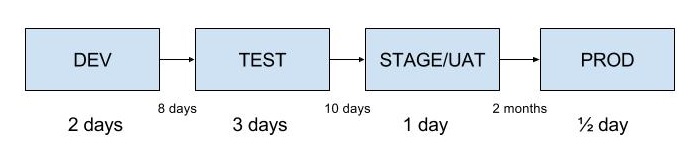
Say for example we have the following times on average for each stage.

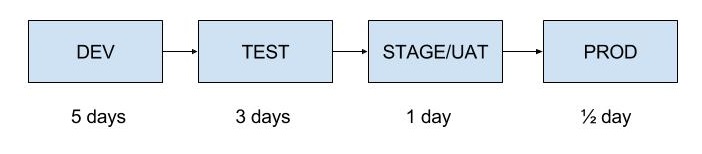
Here, the Testers are staved for work. The same with UAT and well, we’ll just say migration to prod is the same.
In traditional manufacturing, the way to control flow is to limit the work to the slowest point. In this instance it is development, which takes 5 days. Any project manager with half a brain will tell you this isn’t acceptable, and they are right. The throughput is too low. So how do you increase the throughput?

Increase Throughput

One way is to increase the number of developers.
Now for our example we have developers releasing a feature every 2 days.

The Testers are now overworked. A backlog occurs before the testers and will keep occurring. This in itself is not a bad thing, but it needs to be managed. How can you do this, again, with Agile, cross functional teams, if the buffer for test gets too large then Developers can move across to the Testing stage and do testing. When the buffer drops down to a more manageable level, they can move back to Development.

What if increasing the number of developers isn’t an option but you still need to increase throughput. Another way to increase throughput is to identify tasks in the bottleneck stage and try to remove any non-value added work.
This in itself is a lot more difficult to do, but it is significantly cheaper. You have to really think what the developer is doing, determine if the step they are doing is really required or if the step can be done differently or more efficiently. It will take a lot of work, but ultimately it is cheaper for the simple reason you are not paying for another resource.

Now what I have said above isn’t new. Its been talked and implemented in the manufacturing world for at least the last 40 years and is known as part of the “The Theory Of Constraints”.

I know what you are thinking. It’s only a “Theory”. It’s just made up. Well, the person who came up with the “Theory” was Eliyahu M. Goldratt. A physicist, and in physics, a Theory is backed up by empirical evidence through many experiments. It is not something you just make up. It is only called a Theory because in physics as well in the sciences, there is always the possibility that the subject can be proven or disproved by a better process, equation or “Theory” that has been proven by empirical evidence. Goldratt applied the same principles to his “Theory of Constraints”.

In the book “The Goal”, Goldratt used an analogy of boy scouts walking along a track to describe this system and I’m going to steal the same analogy here.

Imagine a line of boy scouts walking down a track. Some boys are faster, and some are slower. The fast boys if they continue walking at their own pace will end up going so far ahead, that you can’t see them.
The boys that are too slow, end up falling behind and keep falling so far behind that you cannot see them either. So what is the solution. Goldratt used a proverbial rope to tie the boys together. The boys that go too fast get tugged back by the rope.
The boys that go at normal pace also get tugged by the rope. They all get tugged by the slowest person. There is no point pulling the last boy along as all you would be doing is dragging him along. Not a nice thought. So everyone walks at the slowest persons pace.
The only way you can get the whole troop to get faster is to increase the speed of the slowest person. The bottleneck. Goldratt called this “Drum, Buffer, Rope”.
Drum – The pace is set by the slowest person/process. ie, everyone follows the same rhythm of the drum.
Buffer – The slack in the rope. There needs to be some buffer to be able to handle outages and variances. Not too much buffer, nor too little. Experimentation will help determine the best level.
Finally, the rope. The rope implies a pull system. Work is pulled along the line rather than being pushed. As I mentioned in my previous post, this is how the Kanban system works. It makes sure that no person or process is overworked.

Goldratt had 5 steps to achieve this.

  1. Identify the bottleneck. I’ve described a couple of methods to do this above, but the only way you can identify a real bottleneck is through single piece flow.
  2. Exploit the bottleneck. What does this mean. Try to make the bottleneck faster by finding ways to quicken the work. Eliminate waste or try doing something differently to see if it does it quicker. Also make sure it is never staved of work.
  3. Subordinate the bottleneck. This is where you slow everything down to the bottleneck speed.
  4. Elevate the bottleneck. In this case, if you still need to increase throughput, add more resources.
  5. Finally, repeat the process fort the next bottleneck.

The steps are simple, but implementing them can be extremely difficult. Half the time you don’t know what you are doing, but this is where experimentation comes in. Keep trying new things, but remember Peter Palchinsky’s principle:

  1. Seek out and try new things.
  2. when doing something new, so it at a scale where failure is survivable, ie. not at the cost of your productivity or at a monetary cost so great that if it doesn’t work your company goes bankrupt etc.
  3. Finally, seek feedback and learn from your mistakes as you go along.

Waiting

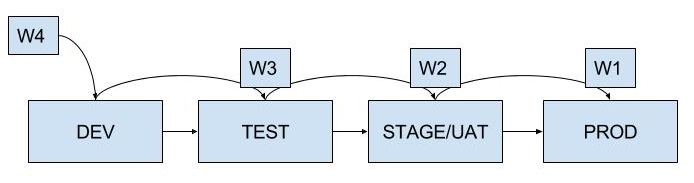
Now, another thing I mentioned previously was recording the time between stages. In other-words, how long a piece of work waits before it is worked on.

This diagram is a very rudimentary value stream map. A value stream map shows how long it takes for a piece of work from conception to fruition to start giving value. When does a piece of work start giving value in software? When it is being used in production.
Here we have the times a piece of work waits before it is processed by the next stage. Those of you in Agile probably don’t see times like these, but with Waterfall, you definitely do. In this made up example, for a single piece on average to get to production there is 78 days of waiting! with only 6 1/2 days of active work being performed on this piece.

That means that it takes 84 days in this instance before a piece of code is helping your company make money. The shorter we make that time, the sooner the business gets the value, but also the sooner we are able to find out any problems and address them.

Now normally I would end here, this article gives some of the building blocks to improve throughput and increase speed, but as these techniques are simple and for quite a number of people seem to make sense, I thought I would go through a trap that I’ve seen.

False Flow or Multitasking By Stealth


I’ve seen the following done with some variances, but doing something similar using a Kanban Board for a team starting out with Scrum.
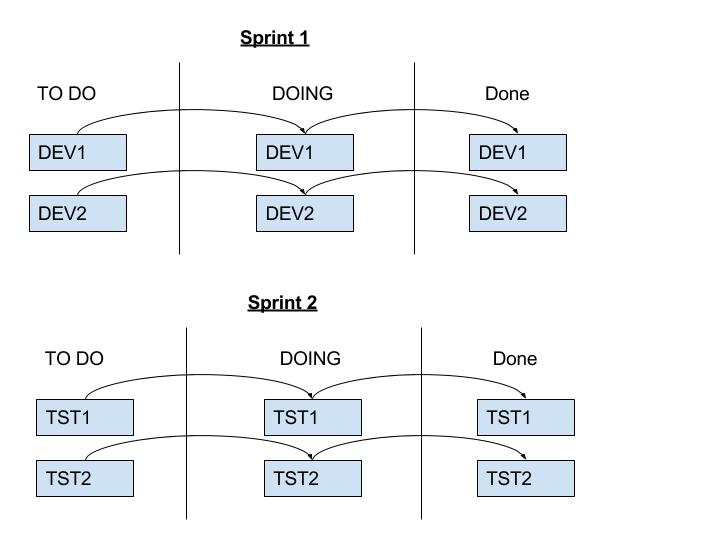
Here you have a piece of work flowing through the Kanban board, but its not actually a piece of work, its a task. A development task. Here, development tasks are being batched up, but because there is one card per task – not per piece of work, there is no flow although the movement of cards gives the illusion of flow.
I’ve also made it quite obvious here by naming the tasks “DEV”, but this is not always the case.

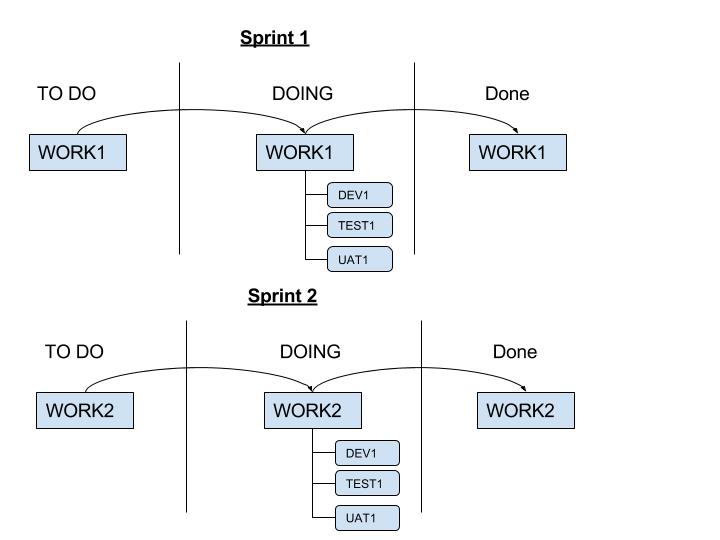
The correct way to implement is to have the work all encompassing of all stages of the development cycle. The individual tasks for each stage linked to the piece of work. This highlights when you are doing proper flow as opposed to false flow.

Using these techniques continuously over time, you should see improvements in throughput.

Please let me know your thoughts of this subject in the comments. Am I full of it or does this make sense. I’m very interested to know.

An Agile Story…Sort Of

This article first appeared on the Scrum Alliance Community Articles.

One of the most inspirational Agile stories I have heard isn’t really an Agile story. It’s the story about the New United Motor Manufacturing, Inc. (NUMMI). It’s a Lean/Toyota Production System story about how collaboration between two enterprises can lead to great things.

In the beginning . . .

The story starts at a General Motors (GM) manufacturing plant in Fremont, California. GM had been running the plant since the 60s, and by the early 80s, it was one of the worst auto manufacturing plants in America — not only in terms of quality of the cars manufactured, but also in terms of the workforce as well. The relationship between the workforce and management was, to put it mildly, adversarial. The workforce was unionized, so it was difficult to fire anybody, and management wanted throughput increased. Over time, the relationship degraded to the point where the behavior was careless and unprofessional.

Management’s hands were tied by the unions, but they made sure that the work got done. Why did things degrade to such a point? To put it simply, the workers had no pride in their work. It was only a job.

The cost of stopping the line

What was there to take pride in? All that was drilled into the workers was that the line had to move. If it didn’t, it would cost the company $15,000 per minute while it was down. If someone was fired, then the workforce would walk off the job, causing the company significant losses. Management pushed and pushed. There are accounts of people falling into the pit, yet they would not stop the line. If someone was injured, they would not stop the line unless it was an emergency. Find a defect, mark it with a slip of paper, and send the car on its way under the mindset, “It will be fixed later.”

And, boy! Was it worth fixing problems later! The overtime was lucrative. Be it a wrong bumper bar put on the car or something wrong under the dashboard, it was worth fixing later, even if it meant ripping out the entire dash, fixing the problem, and putting it back together. The dash would never be right again, but neither the workers nor management cared at that point. It was the customer’s problem. The fixing aspect was standard practice at the time, and the car quality suffered for it. (I remember that here, in Australia, there were problems with Holden Commodores. Car doors would not sit right, and “lemon laws” were introduced.) Eventually GM had enough, and in March 1982, the plant was closed. The entire workforce was laid off.

The partnership

Meanwhile, Toyota was trying to break into the American market. It entered negotiations with GM. GM would supply the facilities, and Toyota would teach them the Toyota Production System. Toyota was making cars more cheaply then, and of better quality than any American manufacturer could. So for GM to get the “secret sauce” was considered lucrative.

In 1984, the Fremont plant was chosen as the location, and the venture was called NUMMI. As part of the deal, more than 85% of the workforce that had been laid off two years earlier had to be rehired. Charles Duhigg’s book Smarter Faster Better: The Secrets of Being Productive in Life and Business recounts the story of Rick Madrid, one of the line workers who was fired from GM and rehired by NUMMI. Madrid recalls that after he was hired, he was sent to Japan to see how things worked. When he reached the Toyota plant, he remembers seeing everything pretty much as it had been in Fremont, but more clean. He recalls thinking, “Why the hell did they send me all the way here to see how things are done when it’s almost exactly the same as it was done at home?”

And then something happened: He saw a worker put in a bolt for a car door incorrectly. Nothing unusual about that; it was a common problem. But what happened next blew his mind away. Instead of marking the defect and then carrying on to the next job, the worker raised his hand and pulled on a cord. Lights flashed and music played. The worker then removed the bolt, and the line resumed. The worker’s supervisor arrived and asked questions. The worker ignored him and carried on, while giving his supervisor orders! Had anyone done that back in Fremont, they would have been decked.

When the car had reached the end of the station, something amazing happened. The entire line stopped. Another manager came up, but instead of yelling, the manager laid out a new bolt like a nurse lays out surgical instruments for a doctor. The worker then ordered both managers around. During this time, at every other station, workers were double-checking parts they had already installed. Rick was thinking that this was costing Toyota $15,000 per minute. Once the bolt was back in place correctly, the worker raised his hand and pulled the cord again. The line then resumed, and everyone went back to work. Rick was floored.

That scenario wasn’t the only surprise Rick Madrid saw while in Japan. Halfway through a shift, he observed a worker, who had an idea for a new tool to help him with his job, tell his manager about it. The manager went off to the workshop and, 15 minutes later, came back with a prototype. The two refined the tool for the rest of the shift. The next day, everyone their own similar tool.

When Rick got back to the States, he told his fellow workers what he saw. They didn’t believe him. What Rick saw was Toyota’s philosophy that the person doing the work is the expert at what needs to be done. The individual is in charge when something goes wrong; it is his or her responsibility to fix the problem. It is management’s responsibility to support the worker in fixing the problem. It is management’s responsibility to help, guide, and support the workers in doing their job, not just to order them about. Also, Toyota hates waste, and it’s a waste to not exploit everyone’s expertise.

Applying Toyota’s philosophy back home

When the Fremont plant reopened, those who returned to work didn’t go back to their old ways. They were too scared. They needed their jobs. Therefore workers didn’t start pulling their cords when things went wrong. This was not good, as Toyota’s philosophy is to fix problems at their earliest point when they occur — that is, at the time the problem is identified.

A month after the plant opened, NUMMI’s president Tetsuro Toyoda was touring the facility when he spotted a worker who had put in a taillight incorrectly and was struggling to get it back in. He looked at the man’s uniform for his name and said, “Joe, please pull the cord.” The president, Joe’s supervisor, and his manager were all watching.

“I can fix this, sir,” said Joe.

“Joe, please pull the cord,” repeated Tetsuro. Up to now, the cord had been pulled only three times since the opening of the plant, and one of those times was by accident. Everyone was afraid to cost the company $15,000 per minute.

Joe repeated, “I can fix this, sir.”

Tetsuro took Joe’s hand, raised it to the cord, and then pulled it. Joe was shaking. The two men then fixed the taillight and pulled the cord again. From that point on, workers started pulling the cord more often. Now, you would think that this would have been bad for Toyota. However, in a typical Toyota factory in Japan, the cord is pulled more than 5,000 times per day. Toyota’s philosophy of fixing problems when they occur has been found to be significantly cheaper on average than fixing the defect later. That is why pulling the cord is encouraged.

It didn’t take long, about six months, for the Fremont plant to produce cars of the same quality as those from a Japanese plant. These same workers, who two years earlier were causing all types of mischief, were taking pride in their work. In WBEZ’s This American Life broadcast and other interviews, Rick Madrid remembers fondly his time at NUMMI. He took pride in his work.

It’s a Scrum story, after all

Given that Scrum, specifically, and Agile have their origins in the Toyota Production System, it is my opinion that a ScrumMaster and a product owner have the responsibility to support team members so that they can do the best they can. If that means being ordered around by a team member to fix a P1 issue, resolve a blockage, or even give the team some tough love to point them in the right direction — basically anything that will help them succeed — then so be it. Anything short of that, and you introduce the possibility of failure. When workers are empowered to do a good job; aren’t struggling against impediments; and are given the responsibility, the right tools, control, and support, they will take pride in the work and be more productive. This, in my opinion, is what Scrum and Agile are about.

GM had sent 16 rising stars to start the NUMMI plant. Once the plant opened successfully, the 16 were ready to spread the word throughout GM. They were motivated; they wanted to change the world. But GM put a wet blanket over that spark. They didn’t know what to do with the 16. Some became frustrated over time and eventually quit. All that knowledge was lost. It took GM more than 15 years to implement the lessons learned at NUMMI, but by then it was already too late. In 2009, in the middle of the global financial crisis, the auto industry was all but destroyed. The fallout is still being felt today, with the closure of car manufacturing here in Australia. GM became the largest industrial bankruptcy in U.S. history. The NUMMI plant closed a year later, in 2010, although it has recently reopened as a Tesla plant.

Rick Madrid retired in 1992. His hat and badge are at the Smithsonian in the American Enterprise exhibit.

References

User Stories

This post was originally published on the Scrum Alliance Community Articles

User stories are, well, stories. This should be obvious, but, unfortunately, it isn’t.

They are not statements, such as “Build a new front page.” They are a story. Stories have a hero or heroine, a goal, and a quest.

User stories are not riveting, but they tell us, from a user’s perspective, what the user is trying to accomplish and, more importantly, why. They are not absorbing novels; they take the form of only three lines.

Here I want to go through my understanding of what user stories are, how to write one, and when to use one. User stories are just like any other tool — there are times when you should use them, and times when you shouldn’t.

How it all began

In Waterfall, the first thing developed in software was the “requirements specification.” (Some of us, myself included, still write these today.)

This formal document described, in intricate detail, what was needed in the development. Who was responsible, who wrote, who changed things. If you were lucky, it also included the why. The document was used as a way to get agreement from the customer on what the development was supposed to be.

It sounds logical to think through what needs to be developed before you start the work. Making it formal makes it, effectively, a contract. In most cases it did become the contract. It also allows you to figure out up front how much effort is involved.

The problem was that, once development started, people would change their minds. Customers would have changing requirements. For a project that lasts six months or more, priorities can shift. What was business critical when the requirements were written can become irrelevant by the time feature development started. The difficulty of what needed to be done could be significantly more than what was initially envisioned. Agile came about to handle this situation from a development perspective, but something needed to be done from a requirements perspective. A requirement was still needed — developers needed to know what to build, but they didn’t need a detailed specification, just enough information to have an idea of what the customer was thinking so they could get started. The details could be worked out along the way, through talking with the users.

So some bright spark developed the idea of using a story to tell what the user was trying to achieve, and the practice has developed over the years.

Why use user stories?

One of the most obvious reasons to write user stories is that they are only three lines long (in the classic case), as opposed to being a formal document of several (or more) pages. That means there is less administration. You don’t need to update the user stories.

Now I know what some of you are thinking: A user story is only three lines long, so it cannot have much detail compared to a traditional requirements document. You’re right. They don’t have the detail, but that is the point. A user story is not a replacement for a requirements document, it’s a trigger to have a conversation with the relevant people, when required, about the requirements. In fact, the idea is to have continuous collaboration with the customer through discussions, and ongoing confirmation to keep refining the product.

Since user stories are small, they are also easier to estimate accurately.

User stories promote smaller iterations of work. With smaller iterations, you can get feedback sooner, which helps the refining process. It also allows you to change priorities as needed, without significantly affecting other pieces of work already in flow.

The INVEST principle

To explain all this a bit more clearly, we have the INVEST principle. INVEST names a list of principles that each story should adhere to so that we get the most out of each story and can write them better. INVEST is an acronym that stands for:

  • Independant. Each story needs to be independent of the other stories. This allows stories to be prioritized separately and cuts down on dependencies. For example, you cannot complete one story if you are waiting on another story to be complete. Or you cannot test a story if it is dependent on another story.
  • Negotiable. Teams need to be able to negotiate stories with the product owner. Circumstances change, and the team or the product owner needs to be able to reconsider how the story is both implemented and scoped. An example may be that the story is not technically possible. (Howevr, even though the story can be negotiated, the product owner still remains accountable for it.)
  • Valuable. A story must have some value to the business. This is to prevent additional features from being developed that end up being of no use, or that the developer thought were good ideas at one point but have since become of no value.
  • Estimable. The story needs to be written in such a way that the team can estimate how much effort is involved. This tries to avoid the problem of scheduling or making promises based on inadequate information.
  • Small. Stories are small increments of functionality. This helps helps the project be built by small bits of value at a time, rather than by large chunks that might end up not being used.
  • Testable. This helps make the requirement a known entity. It gives you something that you can verify. It is part of the Definition of Done. It is to prevent stories such as, “Write requirements” and prevents ambiguities such as, “The page must load quickly.” Instead, a measurable requirement is given, such as, “Must load within 10 seconds.”

Now that we know the principles of a story, how do we format them? There is a formula.

3 C’s Formula

The 3 C’s formula outlines how stories are put together. They are:

  1. Card: User stories are captured on a card (usually a 3×5). The description is on the front, and the acceptance criteria are on the back.
  2. Conversation: The card is a trigger for discussion of the requirements among:
    • Team members
    • Team members and the product owner
    • Team members and stakeholders\users\customers
    • All of these groups
  3. Confirmation: Finally, the user story helps the team discuss with the product owner how to determine when a feature/piece of work is complete.

Now we come to the juicy bit.

How to write a user story

So, to summarize, user stories are a description of a requirement in story form, from the user’s point of view. They are not written from the developer’s point of view, nor that of the product owners, but from the point of view from the person who is actually going to use this thing.

User stories are also short and succinct. They do not waffle on (like this article).

However, they can take one of many forms. Here are a couple of useful templates.

User story templates

The following is the classic version: As a [role]
I want to [requirement]
So that [reason/ROI]

The role is the “who,” our hero/heroine, the user. The requirement is the “what,” or quest, that our hero/heroine is trying to achieve. The reason/ROI is the “why.” Why does the user want the requirement? What is he or she trying to achieve? In other words, what is the goal?

An example based on a traditional story could be:

As a member of the Rebel Alliance,
I want to destroy the Death Star
So that I can save the galaxy.

Another variation on this template is the “In order to” template. It goes like this:

In order to reason/ROI
As a role,
I want to requirement.

Same information, but different wording. These are the more traditional ways of writing user stories, but they are not the only ways.

Comics

I attended a seminar at Elabor8 on using comics as a method of writing user stories. As they say, a picture is worth a thousand words, what better way than with a comic strip?

Can’t draw? It doesn’t matter. Use stick figures. Alternatively, if you are really worried about your drawing ability, try photos.

Movies

With the prevalence of smartphones, we almost all now have a video camera in our pocket. So, if it makes sense, why not act out the scenario of the story? It’s another way to express the requirements, and who knows, it might be fun. You might even be able to record a statement of the requirements, if the product owner is willing.

These methods can then be captured in your software-based backlog if you use something like JIRA, or you can put them on a web server, and print out links for physical cards, or insert links in electronic ones.

The whole idea is to try different things. See what works. If it’s a waste of time, you’ll know quickly; but it might boost your understanding of the story.

Impact mapping

One tool I like is Impact Mapping, created by Gojko Adzic. An impact map is a type of mind map that allows you to brainstorm and explore scenarios. “Branches” are then trimmed based on the team’s ability to implement them. Ultimately you are left with the branch you will implement. The impact map is drawn in such a way that you have who the feature is for, why the user wants the feature, and finally the “What” and “How” you need to do the feature. This is what the user wants.

An example of an impact map is below:


With an impact map, you start of with the why. Why are you doing this? In the above example, we are trying to save the galaxy. Next, we look at who is trying to achieve the goal. This would be our user, the our hero or heroine. In this case, it is a member of the Rebel Alliance. Next we have the how we are going to achieve our goal. This is where the brainstorming really starts. List as many ways as you can think of to achieve the goal. It doesn’t matter if they are realistic, just write them down. Who knows, they may lead to something.

Finally, for each how list, what needs to be done. Keep everything at a high level. We are not trying to solve every branch, only to get an idea of what is involved.

Once you have your impact map, you start trimming branches. Something may be impractical. Something may not be ready to do. Something may require resources that you do not have.

Eventually, after several iterations, you should have a single path to follow. But don’t spend too much time on this map; it is just there to give a visualization of what needs to be done, along with alternative views. You still may end up selecting the original proposal, but it will be a definitive answer with alternatives having been explored.

Now that you finally have the Why, Who, How, and What, you can write your story:

As a member of the Rebel Alliance,
I want to destroy the Death Star
By Sending two torpedos down an exhaust pipe that has been found to be a weakness in the Death Star’s defenses,
In order to save the galaxy.

Now that we’ve filled out the front of the card, it is time to look at the back.

Acceptance criteria

On the back of the card (or its software equivalent), you have the acceptance criteria. It outlines how the story will be verified as Done by the product owner. This needs to be hard criteria, not anything ambiguous. It’s best that the criteria be testable. If you can test it, you can define it.

Just like the story, the product owner is responsible for writing the acceptance criteria (with consultation from the team). For example, business analysts can help write the acceptance criteria, but it is up to the PO to accept them. Sometimes the acceptance criteria are used as part of the Definition of Done.

Acceptance criteria template

Just as there is a template for the user story, you can use a template for the acceptance criteria. An example:

A [role] should be able to:

  • [Acceptance Criteria 1]
  • [Acceptance Criteria 2]
  • [Acceptance Criteria 3]

Edge cases:

  • [Edge Case 1]
  • [Edge Case 2]

Separating out the edge cases helps your thinking process. You work on the normal cases first, then brainstorm the edge cases.

This acceptance criteria is a placeholder for further discussion to get confirmation from the PO. Then more detailed acceptance criteria can be determined.

Gerkins and Cucumbers

For acceptance criteria, I like the Gerkin language. It was initially developed for use by a program called Cucumber. Cucumber is a behavior-driven development program that allows you to specify acceptance criteria in plain English, then execute those statements as tests. Yes, execute!

Gerkin takes the form of “Given, when, then” statements. The Given section is your preconditions. It’s where you set the stage for what needs to be done. The When section is when you actually do something to the preconditions. The Then section is where the expected effect is described. For example:

Given two numbers, 1 and 3,
When I add these two numbers together,
Then I expect the result to be 4.

Nice and simple, easily understood not only by developers but by anyone who can read.

Now, I mentioned that Gerkin is used by Cucumber, but that is where it started. There are now a number of products that use this language to produce executable specifications. These include, but are not limited to:

  • JBehave
  • EasyB
  • Gwen

The beauty is that you don’t need to use these products to get the benefit. Just writing your acceptance criteria in this format means that it’s easily readable, verifiable, and future proof. So, for example, if in the future you wish to use one of the above products to make the acceptance criteria executable, the writing of the tests is done.

There are other types of programs that also allow you to write executable acceptance criteria. These are more free form and allow you to do more traditional documentation; Concordion and Fitnesse are examples.

Concordion uses HTML pages to write the acceptance criteria, and Fitnesse uses a wiki.

With most of these products, to make the specifications executable, bridging code is required to allow the interpreter to execute the tests. Usually the bridging code can be simple and reusable. But determining the complexity depends on what type of application you’re writing. I won’t go into how to write these, but I recommend investigating them anyway.

Epics and themes

Now we come to stories that are too big to fit into one sprint. These are called epics and themes.

So . .

What is an epic?

To put it simply, an epic is a very large story. Not in terms of description, but in terms of implementation. An epic is a story that can take more than one sprint to complete.

In the “Story World” (going with our Star Wars theme), an epic would be the Star Wars Trilogy. The epic in this case is made of (originally) three stories, Star Wars, The Empire Stikes Back, and Return of the Jedi. Each of those stories is watched in one sitting, just as a story will be done in one sprint.

What, then, makes a story an epic? There can be a number of reasons: A story may be at a very high level and need more information. Usually when the backlog is first created, all stories are considered epics. In other words, the epic is used to capture requirements at a very high level. Another reason could be simply that the story ended up being bigger than you initially thought, and therefore it cannot be completed in one sprint.

Epics are not the only way large stories can be described. We can also use themes.

What is a theme?

A theme is a collection of stories that have a shared attribute. For example:

As a Star Wars fan,
I want a group of pages to explain the movies
So that people can learn more about the Star Wars movies.

Here, the word group insinuate that the PO wants more than one page. So, this theme can be broken down into:

As a Star Wars fan,
I want a “New Hope” page
So that I can see details about the first Star Wars movie.

As a Star Wars fan,
I want a “The Empire Strikes Back” page
So that I can see details about the Empire Strikes Back movie.

and so on. As you can see, the two stories are identical except that they discuss different movies. The theme here is that they are both pages about Star Wars movies.

Again, just like epics, themes generally cannot be completed within one sprint, unless of course the stories are quite small. This means that the stories themselves are completed in the relevant sprint, but the theme, just like an epic, is completed over multiple sprints.

Splitting and combining stories

So now that you know what an epic and a theme is, there may be times when you want to split an epic or theme into smaller stories, and there may be times when you want to combine multiple stories into an epic or a theme. Remember, an epic or a theme is still just a story.

When to split stories

Most of the time, you will want to split a story because it cannot be completed within one sprint. The work is too large for one sprint, so you split the story into two separate stories. You complete one story in the first sprint and the other story in the second. The original epic or theme is then complete.

Another reason to split stories is to get a more accurate estimate. It might be too difficult to estimate a piece or work, so break it down into more manageable chunks, then estimate the chunks individually. Estimating smaller chunks is easier.

How to split stories

Splitting stories can be tricky, simply because there are so many possible ways to do it, and not all of them result in split stories that make sense. Here are some examples.

Does not meet performance constraints. Let’s say you are building a web page that has to load within five seconds. Building the page is easy, but let’s say that the performance of the page will prove difficult; to make it load within five seconds is extremely hard. What do you do? Split the story. The first story is the building of the page. This gives the product owner value. They have a page that the end user can in fact use. The next story is the performance criteria. This will be tackled later. Maybe the next sprint, maybe five sprints later, maybe never, if it turns out that the customers don’t care that the page takes 20 seconds to load.

Separate or mixed priority. This is when some of the acceptance criteria is of higher priority than other acceptance criteria. Split the story based on the different priorities of the acceptance criteria. Do the higher-priority stories first and leave the lower-priority ones until later.

To remove crosscutting concerns. This is when a story has acceptance criteria that applies to more than just that one story. Logging, error handling, and security are examples.

When to combine stories

There may be times when you would like to combine stories. Perhaps the stories are related and both could be completed within one iteration. For example, in transactional processing, you may want to combine the pick-up and drop-off of a transaction in one story. You may also want to combine stories when you want to prioritize them as a group. For example, two stories need to be completed together.

How to combine stories

There are a number of ways to combine stories. They are all similar.

  • Create an epic and then refer the individual stories to the epic.
  • Create a new story, so long as it can fit within a sprint.
  • Create a theme if it is a set of related stories.
  • The whole idea of splitting and combining is to refine the backlog. Combine stories so that twp people do not put the same amount of effort into one story, only to find that the other is similar enough they could have been done in one. Split stories so that larger chunks of work are broken down into more manageable sizes.

Conclusion

In this article I have tried to show how stories work and how they should be used. Take from this what you are most comfortable with, but if you do use stories, make sure you know the correct terminology, what a story is, and how to use it. That is the knowledge I have tried to give you, based on my own understanding. If your understanding of stories is different, please let me know in the comments. We are all learning, and the best way to learn is to share knowledge.